Installation
Import OVA
To install DC Netscope, you have to download and import the DC Netscope OVA file. This file can be downloaded via the easyvirt.com website.
Configuration
The configuration involves several steps :
- Connecting the DC Netscope to the network.
- Enabling DC Netscope to get a description of the infrastructure (via VMware API, or external IPs).
- Configuring Network devices (network switches, firewall, probes) to send SFlow/Netflow metadate to DC Netscope.
The following video illustrates these steps :
Configuration via VAPP parameters
DC Netscope's configuration can be customised via the VAPP parameters. These VAPP parameters can be customised via the OVA import form, or via the settings of an existing DC Netscope VM.
During the import of the OVA
When you import the OVA template in the VMware infrastructure, you will be able to configure the settings of the DC Netscope appliance.
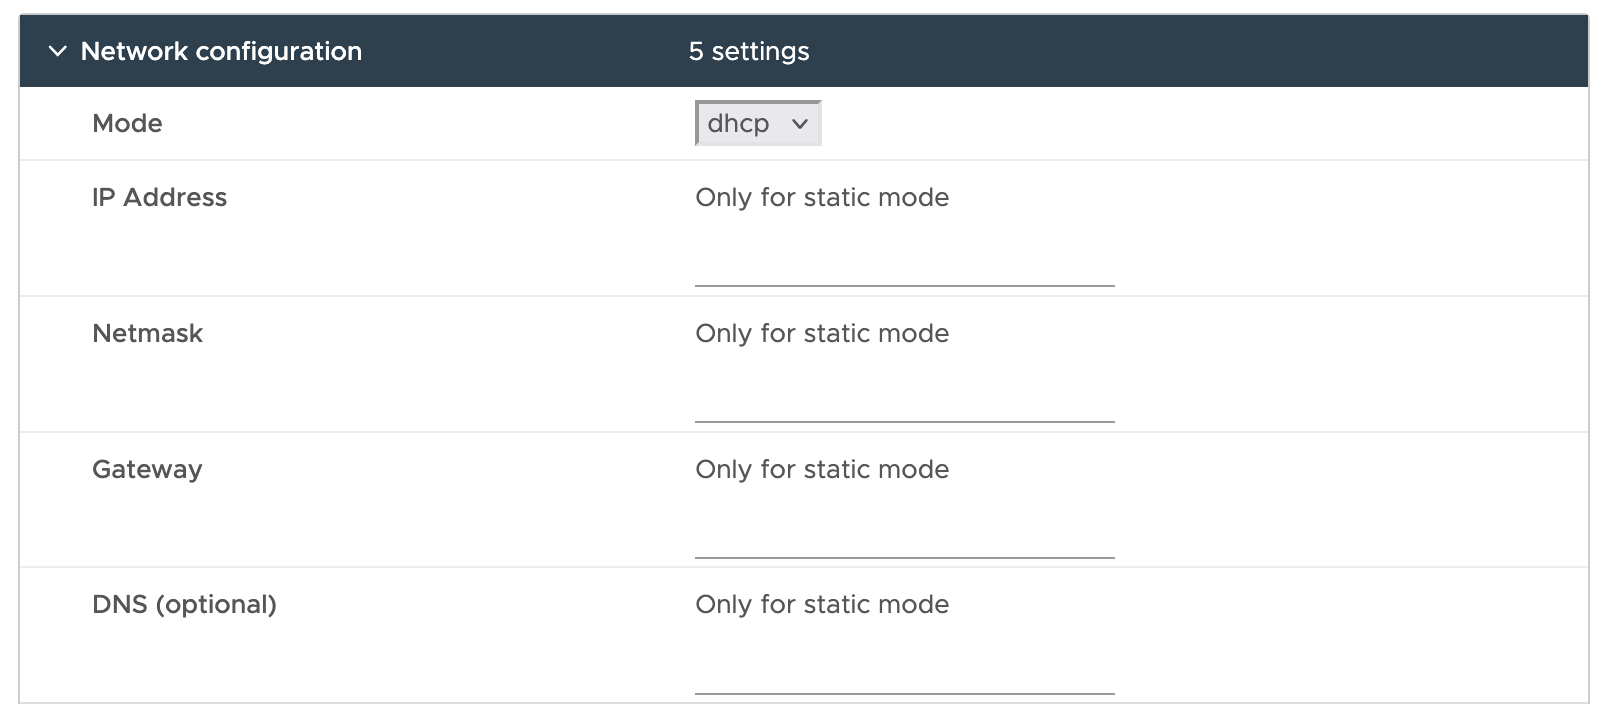
Network configuration
It is possible to specify a static or dhcp based network configuration. If the static configuration is chosen,
DC Netscope will take into account the values entered in the field. Otherwise it will ignore it.
Default administrator account
Provide an email and a password for the new administrator account that will be created in DC Netscope.

After the VM import
It is possible to customise the network configuration, and the administrator account after the import of the OVA. To do
so, select the DC Netscope VM in the vcenter UI, go to the Configure tab, select the Vapp Options and change
the values that appears in the screen.
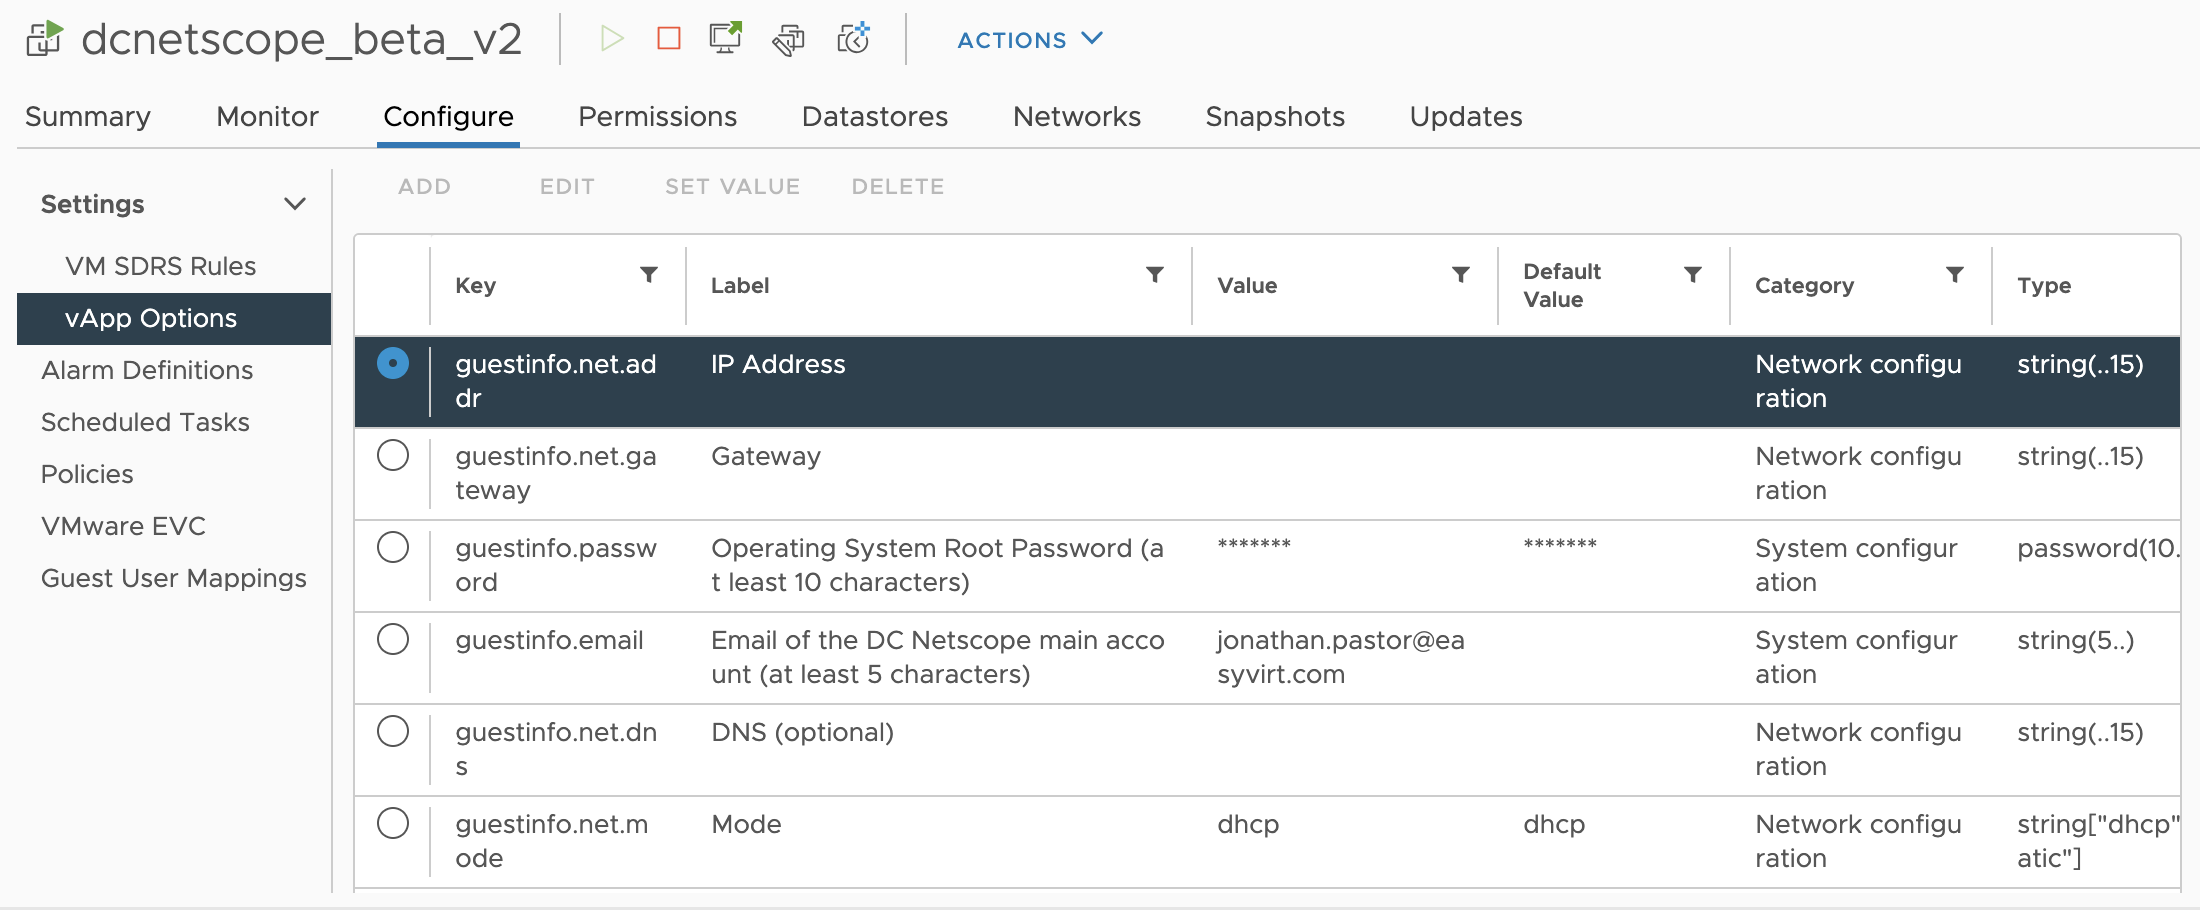
Please note that the VM should be turned-off to edit these values.
Other configuration (cloud-init, manual)
It is possible to specify several configuration parameters via differents means, detailed in the subsection below. These configuration parameters are the following :
email: email for the defaut account (default value: "admin@example.com")os_password: password for the defaut account (default value: "password") and for the root account on the VMip_mode: "static", "dhcp" or "cloud-init" (default value: "cloud-init"). When "cloud-init" is selected, DC Netscope will delegate the network configuration to cloud-init (examples can be found in the cloud-init documentation).static_ip: IP that the VM will use. Ifip_modeis "dhcp" this field is ignored (default value: "")static_gateway: IP of the gateway that the VM will use. Ifip_modeis "dhcp" this field is ignored (default value: "")static_netmask: Netmask of the gateway that the VM will use. Ifip_modeis "dhcp" this field is ignored (default value: "") (default value: "")dns_ip(default value: "") : DNS used by the VM.
Cloud-Init via parameters
You can pass parameters to the DC Netscope VM via Cloud Init. DC Netscope will parse a JSON dictionnary in the
userdata field of the cloud-init configuration. The result of the cloud-init query --all command should look like
the following :
{
    "userdata": "{\"email\": \"admin@example.com\", \"os_password\": \"changeme\"}"
}
Cloud-Init via /tmp/cloud_init_conf file (XenOrchestra)
DC Netscope will check if the file /tmp/cloud_init_conf, provided by XCP-NG, exists. It will read the file as a JSON file.
A typical configuration will look like the following :
{
    "email": "admin@example.com",
    "os_password": "changemepassword",
    "ip_mode": "dhcp"
}
To get started with XenOrchestra, DC Netscope supports an additional xo parameter,
which will be read as JSON dictionnary containing the following fields :
url: url of the xen orchestra.username: xen orchestra account.password: xen orchestra password.
{
    "email": "admin@example.com",
    "os_password": "changemepassword",
    "ip_mode": "dhcp",
    "xo": {
        "url": "192.168.0.25"
        "username": "xcpng_user",
        "password": "xcpng_password",
    }
}
Manual configuration via /etc/dncetscope.yml
DC Netscope will check if the /etc/dncetscope.yml file exists. It will read the file as a YAML file.
A typical configuration would like the following :
email: "admin@example.com"
os_password: "changemepassword"
ip_mode: "static"
static_ip: "192.168.1.5"
static_gateway: "192.168.1.1"
static_netmask: "255.255.255.255"
dns_ip: "8.8.8.8"
User management
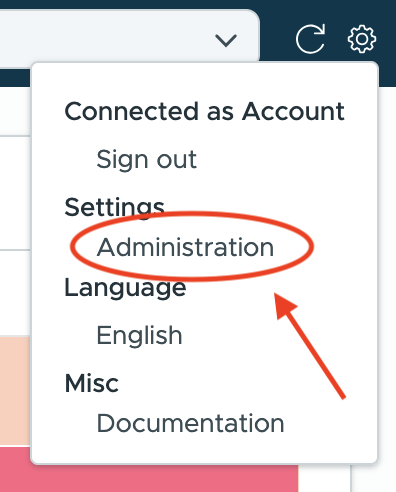
DC Netscope embeds keycloak to manage authentication, authorizations and users. It is possible to create local account, or to delegate user management to third party sources such as LDAP, Active Directory or OpenID sources.
To manage users, go to the Users management section in the administration interface :

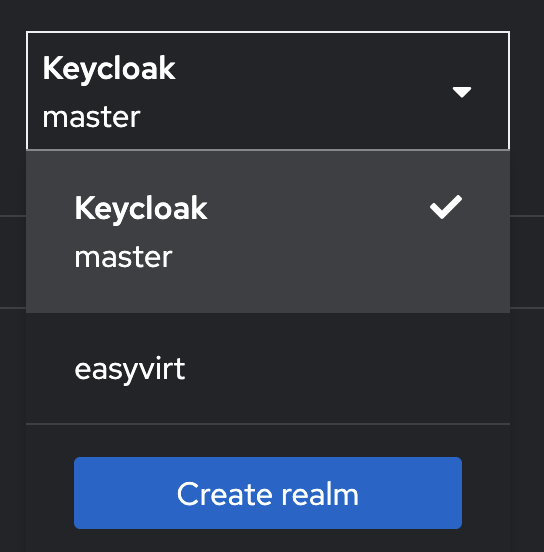
Once logged in with the administrator account, go the easyvirt realm :
Example with Active Directory
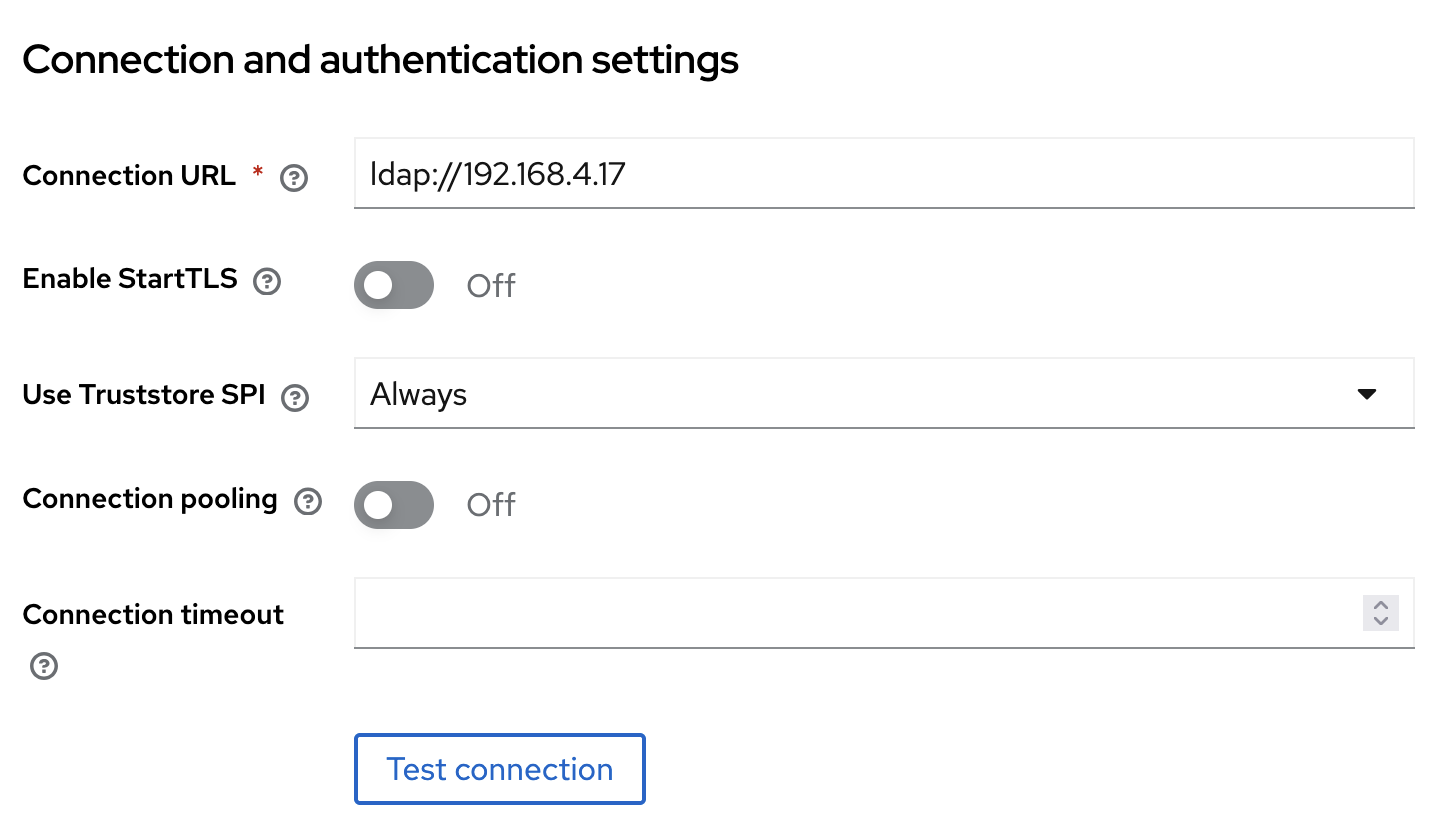
Let say we have a working Active Directory with the following specifications : - IP address : 192.168.4.17 - Users group : CN=Users,DC=easyvirt,DC=local - Admin user : CN=Admin,CN=Users,DC=easyvirt,DC=local
Go to the User federation section, and click on Add LDAP providers. In the next screen, ensure that for the vendor
field, the value Active Directory is selected. Now, we will add the Active Directory to DC Netscope.
First, provide the URL to the active directory. Every time you change a parameter, don't hesitate to click on Test
connection to check if the connection works.
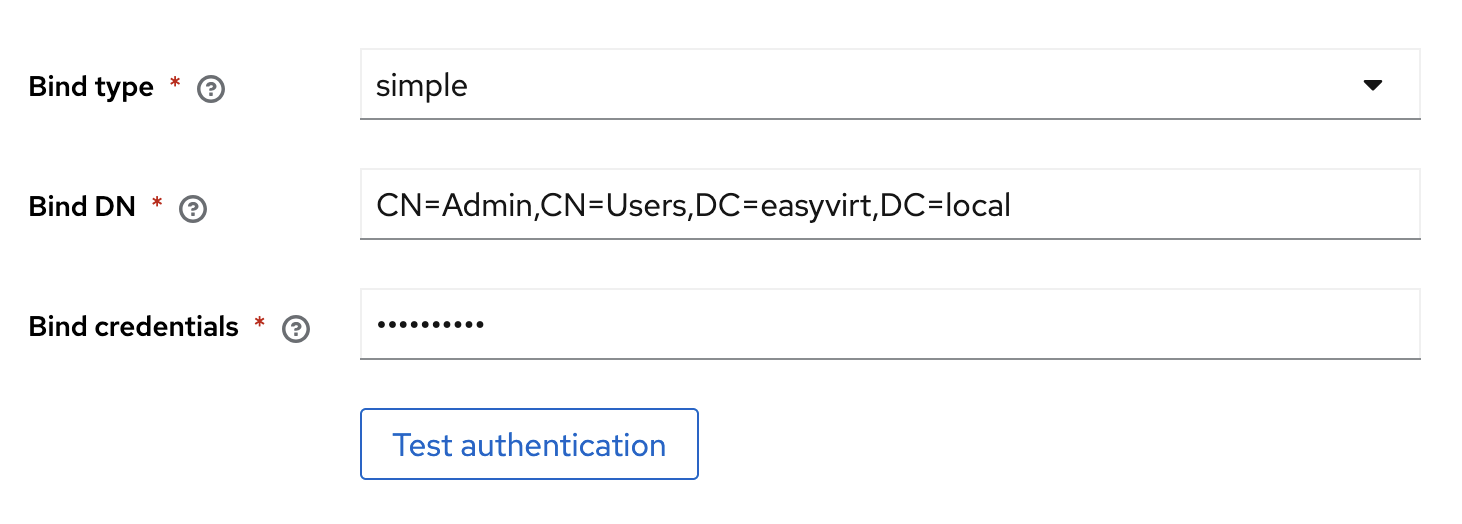
Second, provide an admin account that will be used to authenticate to the Active Directory. Every time you change a
parameter, don't hesitate to click on Test authentication to check if the connection works.
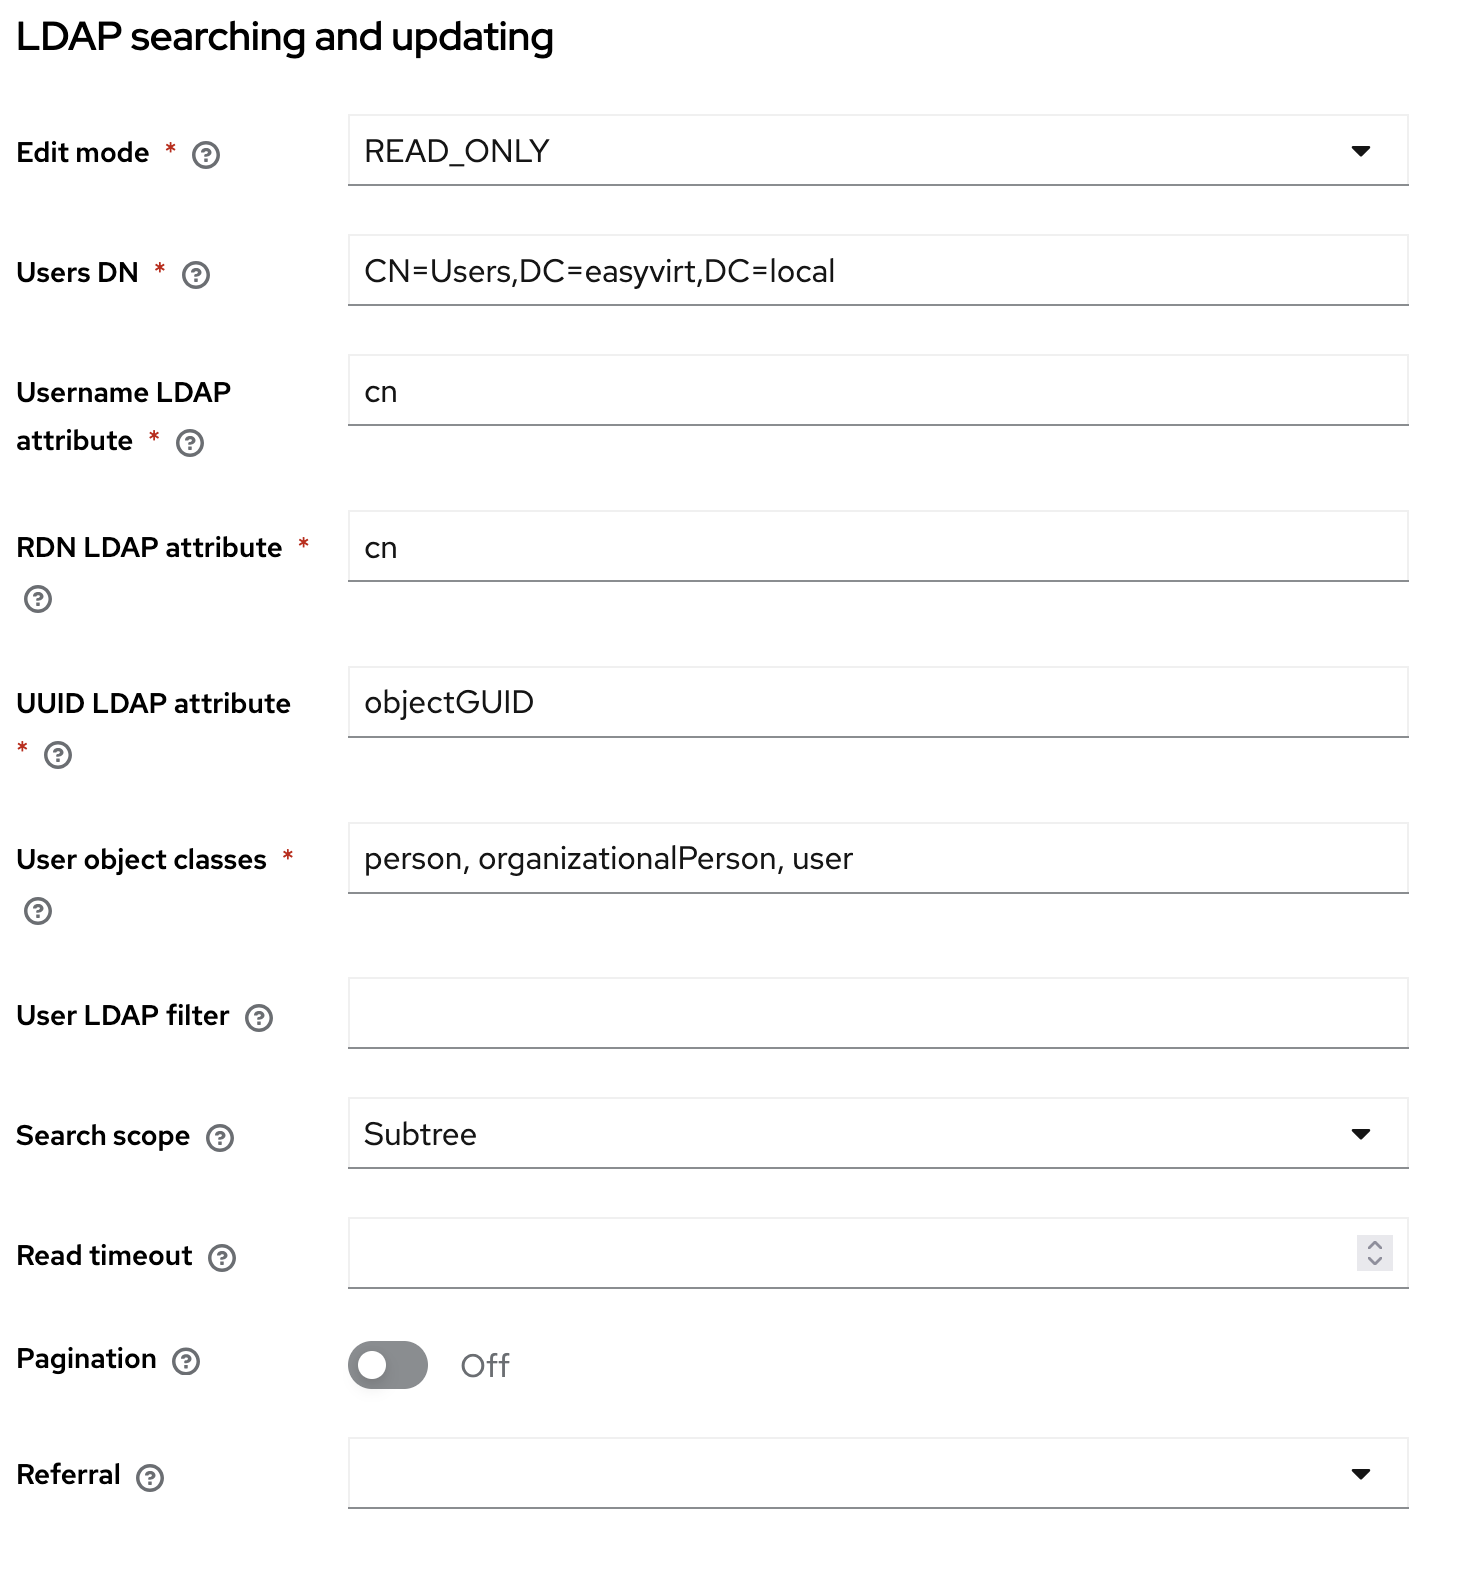
Now, provides information that will help keycloak to locate users that should access DC Netscope.
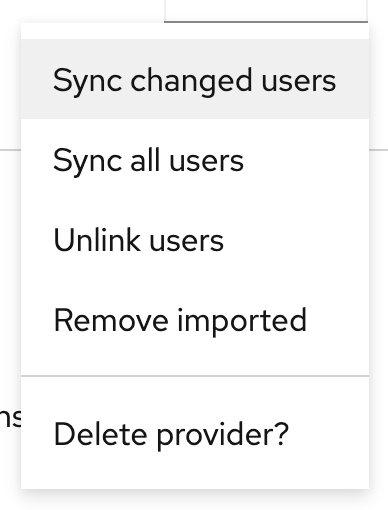
Once you have set up the Active directory, request Keycloak to sync with the Active Directory. To do so, go to the
top of the page, click on Action, and select Sync all users
You should get a confirmation that the users have been synced.

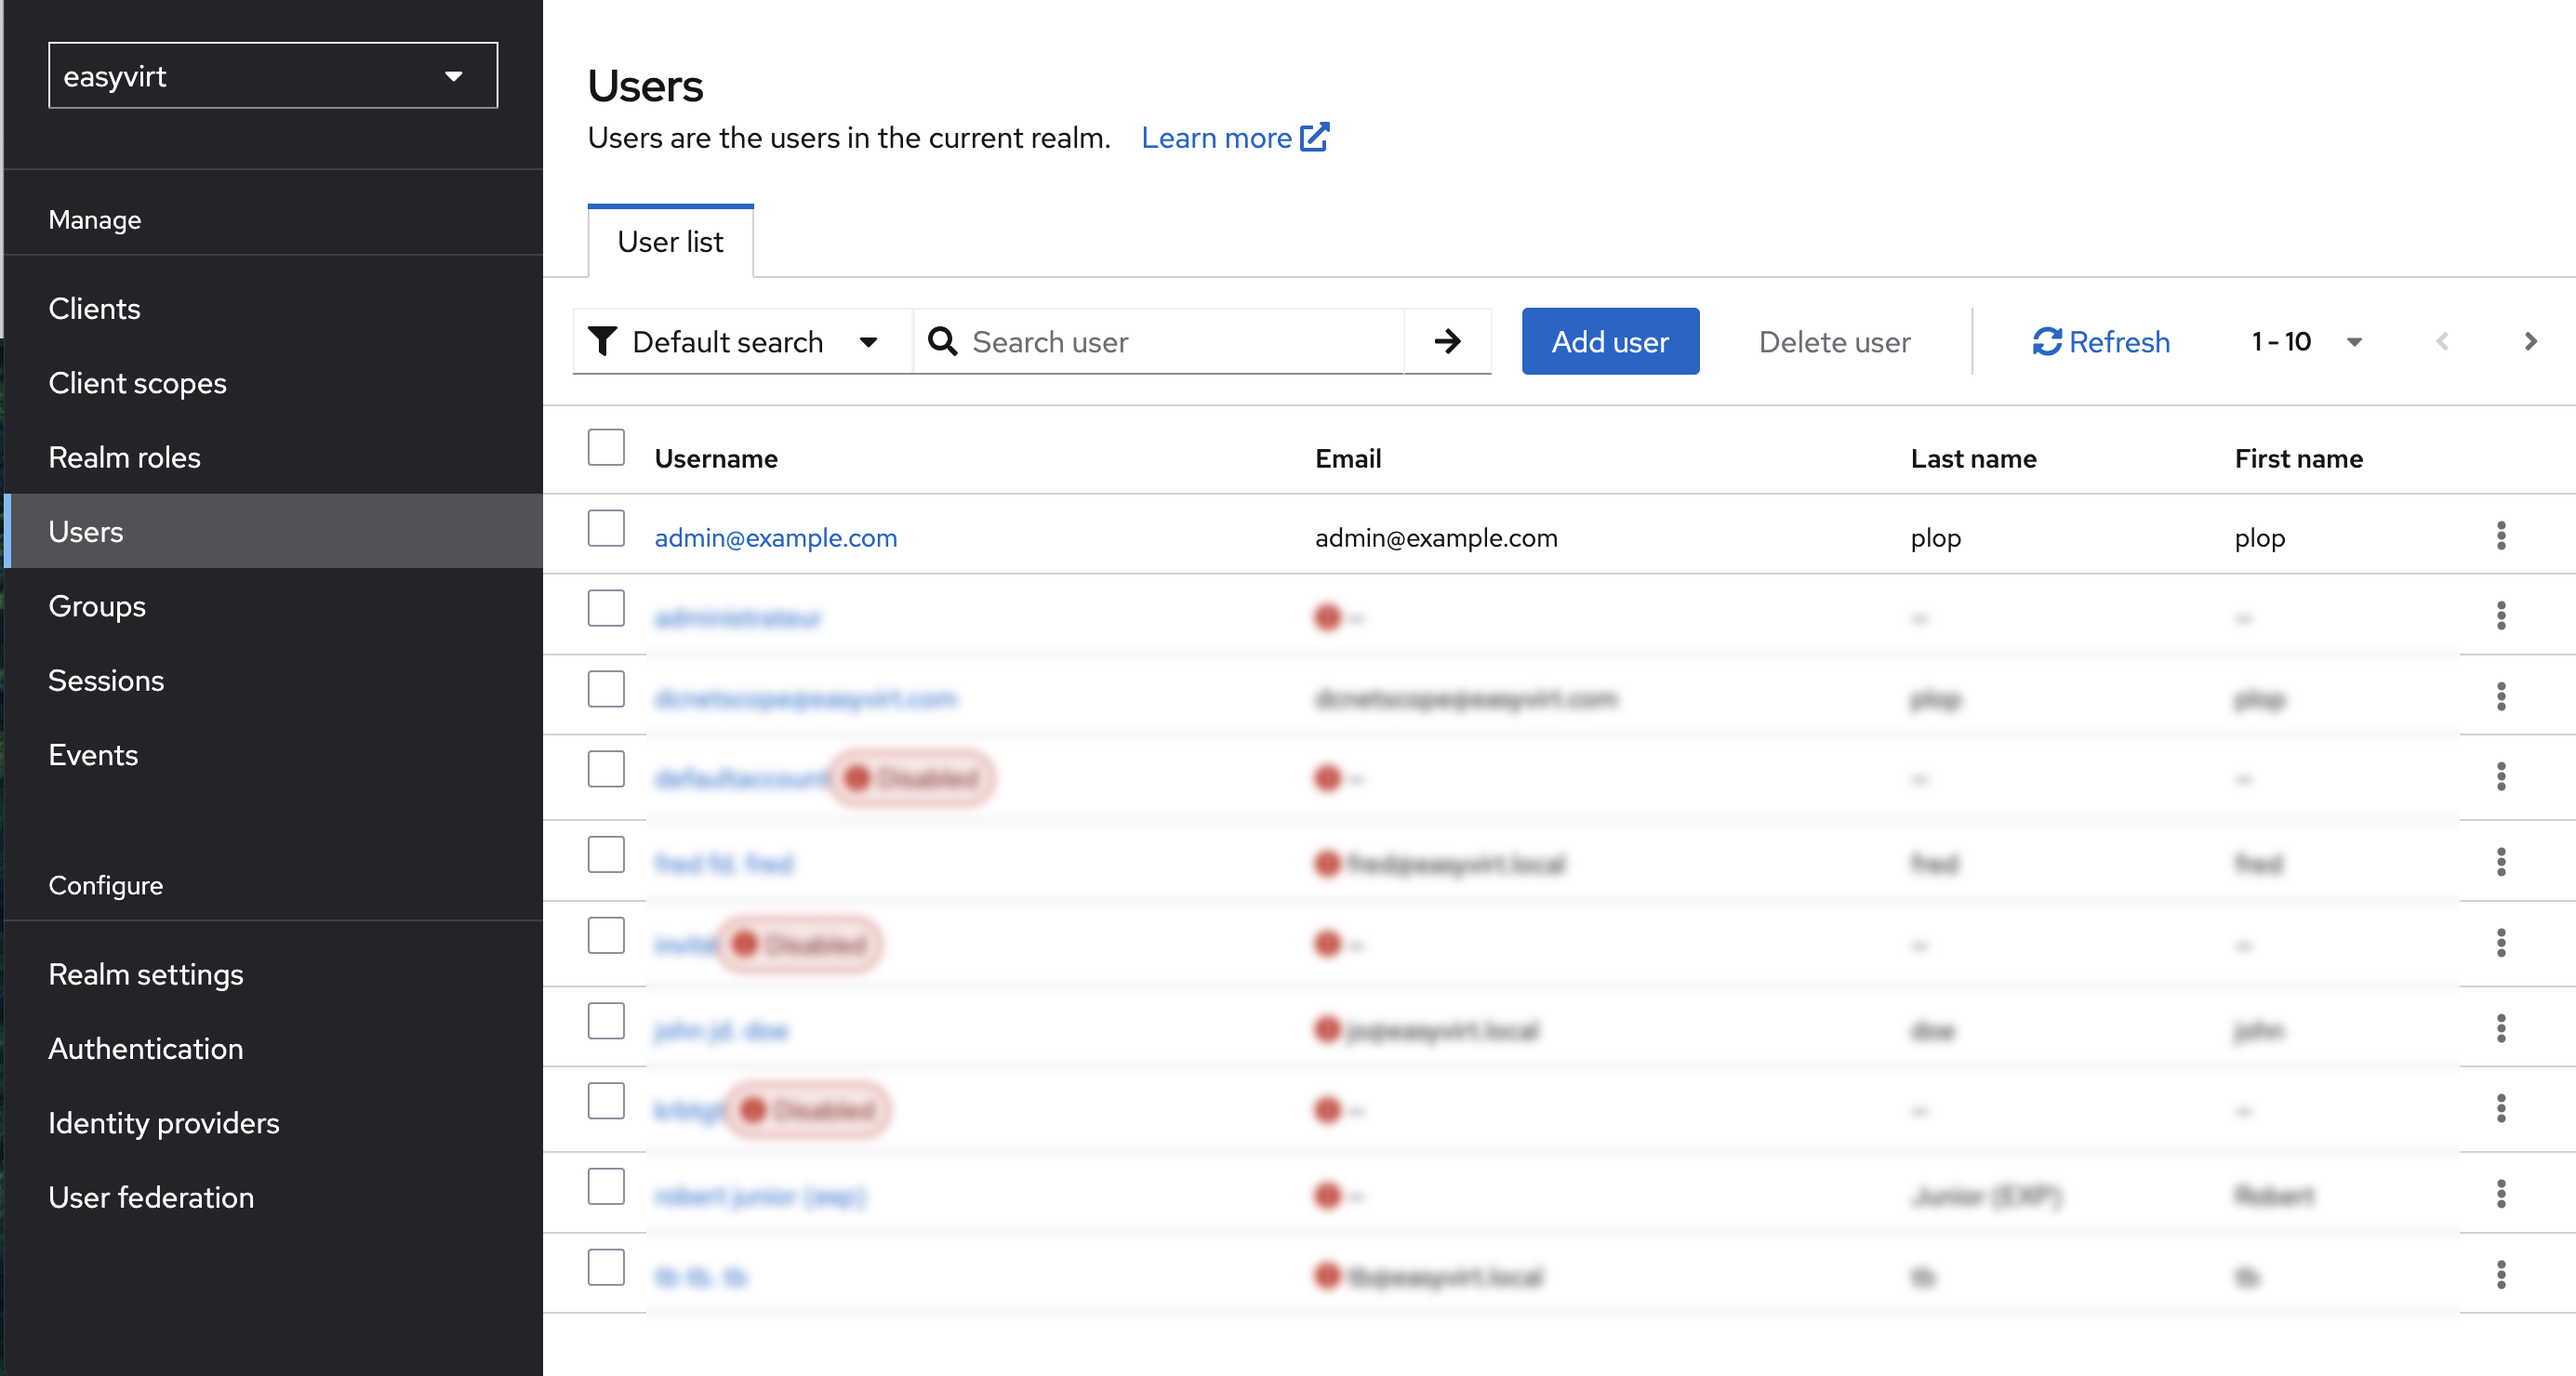
Check that the Users are present in the User section.
Import data from DC Netscope v1
It is possible to import data from a DC Netscope instance. To do so, go the administration section of DC Netscope,
On the bottom of the page you will find a Misc section containing a line that proposes to setup an import of
data of an existing DC Netscope v1 instance. To proceed with the import, first, provide the IP address of the
remote DC Netscope, and then click on the import button.

Progress of the import process will appear. Please note that this process can be long if you have a lot of data.
Configure XenOrchestra to export Netflow data to DC Netscope
XCP-ng uses Open vSwitch (OVS) as its networking backend. OVS can be configured to export network flow data via NetFlow, which can then be collected and analyzed by DC Netscope.
First, to view available OVS bridges on your XCP-ng host:
ovs-vsctl show
For example, you might see a bridge named xenbr0 :
210ec8ad-efdd-4f23-8522-2eebdcda28e1
    Bridge xenbr0
        fail_mode: standalone
        Port vif4.0
            Interface vif4.0
        Port xenbr0
            Interface xenbr0
                type: internal
        Port xapi0
            tag: 0
            Interface xapi0
                type: internal
        Port vif5.0
            Interface vif5.0
        Port eth0
            Interface eth0
        Port vif2.0
            Interface vif2.0
        Port vif1.0
            Interface vif1.0
        Port vif3.0
            Interface vif3.0
    ovs_version: "2.17.7"
In this case, we will configure xenbr0 to export NetFlow records.
Assume the DC Netscope VM has the IP address 192.168.3.73, and the NetFlow collector listens on default port 9000.
Run the following command:
ovs-vsctl -- --id=@nf create NetFlow \
    targets=\"192.168.3.73:9000\" \
    active_timeout=60 \
    add_id_to_interface=true \
    -- set Bridge xenbr0 netflow=@nf
The command can be parameterised :
targets: destination IP and port of the NetFlow collectoractive_timeout=60: flow export interval (in seconds)add_id_to_interface=true: adds interface ID metadata
To confirm NetFlow is properly configured :
ovs-vsctl list netflow
which gives us an output that should be similar to :
_uuid               : ef3b859f-192b-450e-bd29-f8d8177c48c5
active_timeout      : 60
add_id_to_interface : true
engine_id           : []
engine_type         : []
external_ids        : {}
targets             : ["192.168.3.73:9000"]
Warning
Please note that :
- These settings are not persistent across host reboots. You may need to reapply them using a startup script or automation tool.
- This configuration is done at the XCP-ng host level, not through Xen Orchestra UI.
- Ensure that the DC Netscope VM’s firewall allows traffic on the specified NetFlow port (e.g., 9000).